Not long after getting my '07 convertible I found the wells under the rear seat full of water like others have. After 6 months of searching posts and videos (mostly older ones), I think it is now draining properly, so I thought I'd share the things I gleaned in one post.
There are two locations per side that are supposed to drain out the water that falls between the rear of the top and the body:
1. In the corner above the rear deck below the window. This goes through a tube to the rear quarter panel and is usually not a problem.
2. Water that goes past that runs down the front side of the wheel well, landing in the cavity under the rear quarter windows, then draining through weep holes in the pinch weld. This can get clogged and hold a lot of water which then overflows into the area under the seats, then to the rear floor board
Leaves, dirt, and such that get in the space between the top and body make their way down there, decomposing and filling the area that is supposed to drain.
This allows water to accumulate way faster than it can seep through the resulting muck, and here in Florida when we often get an inch of rain a day sometimes it fills up quickly.
Simply poking something up through the weep holes is futile, since the bottom of the drainage area is filled with a fair amount of body panel foam and the actual drain hole which has a fitting on it is not lined up over the weep holes anyway.
There are various maintenance methods to clean out the inside area, but getting into that space is challenging as all get out.
You can put the top down and pop off the interior trim in that area to see a few voids that go way down to the bottom. A leaf blower aimed into some of them will blow up quite a bit of debris, and a shop vac with 1.25" extension tubes can suck some of the area out, but is hard to get into all the crevices.
One video has a guy putting a pressure washer wand all the way in there and blasting the heck out of it and that can really help but getting all the crud out is the key to keeping it flowing.
Removing the speaker reveals a helpful plastic cover to pry off for much better access to the bottom of the drain area, That was a game changer for me and not mentioned in most of the discussions about getting the water to drain. Since my pressure washer wasn't on hand when this project was tackled, I used the jet setting on a garden hose.
Rotating as necessary between blower, shop vac and hose eventually yielded a clean bottom and clear drain. As work progressed, I could blast the area with water and suck the murky water up with the shop vac until blasting the bottom resulted in a pool of clear water which drained out properly.
Hope this helps someone who has this ongoing problem like I did!
I took a few pics, but the site is not letting them be attached right now, will add them later if possible.
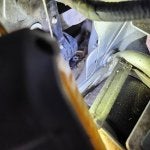
Upper drain entry and exit, easier to clear out but not usually the problem:
![]()
![]()
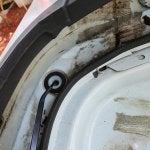
After removing the speaker (and moving the hydraulic cylinder), the plastic cover can be pried off, yielding better access to the drainage area:
![]()
![]()
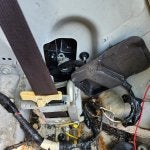
After cleaning, you can see the cavity floor. The white piece appears to be the drain itself?
![]()
There are two locations per side that are supposed to drain out the water that falls between the rear of the top and the body:
1. In the corner above the rear deck below the window. This goes through a tube to the rear quarter panel and is usually not a problem.
2. Water that goes past that runs down the front side of the wheel well, landing in the cavity under the rear quarter windows, then draining through weep holes in the pinch weld. This can get clogged and hold a lot of water which then overflows into the area under the seats, then to the rear floor board
Leaves, dirt, and such that get in the space between the top and body make their way down there, decomposing and filling the area that is supposed to drain.
This allows water to accumulate way faster than it can seep through the resulting muck, and here in Florida when we often get an inch of rain a day sometimes it fills up quickly.
Simply poking something up through the weep holes is futile, since the bottom of the drainage area is filled with a fair amount of body panel foam and the actual drain hole which has a fitting on it is not lined up over the weep holes anyway.
There are various maintenance methods to clean out the inside area, but getting into that space is challenging as all get out.
You can put the top down and pop off the interior trim in that area to see a few voids that go way down to the bottom. A leaf blower aimed into some of them will blow up quite a bit of debris, and a shop vac with 1.25" extension tubes can suck some of the area out, but is hard to get into all the crevices.
One video has a guy putting a pressure washer wand all the way in there and blasting the heck out of it and that can really help but getting all the crud out is the key to keeping it flowing.
Removing the speaker reveals a helpful plastic cover to pry off for much better access to the bottom of the drain area, That was a game changer for me and not mentioned in most of the discussions about getting the water to drain. Since my pressure washer wasn't on hand when this project was tackled, I used the jet setting on a garden hose.
Rotating as necessary between blower, shop vac and hose eventually yielded a clean bottom and clear drain. As work progressed, I could blast the area with water and suck the murky water up with the shop vac until blasting the bottom resulted in a pool of clear water which drained out properly.
Hope this helps someone who has this ongoing problem like I did!
I took a few pics, but the site is not letting them be attached right now, will add them later if possible.
Upper drain entry and exit, easier to clear out but not usually the problem:

After removing the speaker (and moving the hydraulic cylinder), the plastic cover can be pried off, yielding better access to the drainage area:

After cleaning, you can see the cavity floor. The white piece appears to be the drain itself?