

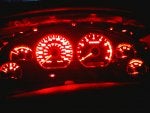
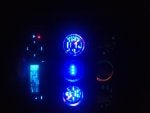
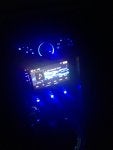
Hey guys, as I promised I am going to be writing up a thread on how and what you need in order to change your gauge face, HVAC controls, and the three toggle switches (in order: rear defroster, traction control, and fogs lights) to whatever color LED illumination you would want while using your stock overylays. Since I myself was not a fan of the "christmas theme" green and red illumination I sought after a way to make mine all solid red to compliment the silver and black scheme with the car. I had hit a few bumps in the road throughout the installs and had the help of several users on this site, but I hope this thread will answer any questions that I had making this an easy going fun install. All in all, it is a relatively cheap mod and the end result is definately a looker!:cooldude: I will list the tools needed, bulbs required for install, and a detailed how-to summary so everyone can do this without searching throughout endless forums only finding vague answers especially for the HVAC and toggles. Pictures will be at the end of the thread. Not too many pictures of taking apart cluster itself as I have provided an in-depth install summary and it is simply self explanatory in my opinion.
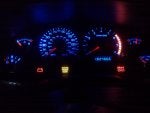
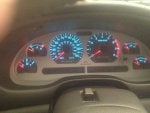
Finished result:
http://www.allfordmustangs.com/photopost/uploads/124965/DSC031462.JPG
http://www.allfordmustangs.com/photopost/uploads/124965/DSC031472.JPG
http://www.allfordmustangs.com/photopost/uploads/124965/DSC03152.JPG
http://www.allfordmustangs.com/photopost/uploads/124965/DSC031511.JPG
http://www.allfordmustangs.com/photopost/uploads/124965/DSC031501.JPG
Tools Needed (Recommended):
T-15 Torx Driver (Cluster and HVAC)
Dremel/Sandpaper (Gauge Overlay)
Flat Head Screw Driver (Gauge Cluster)
Needle Nose Pliers (Bulb sockets)
Kitchen Fork (Needle Removal)
Soldering Iron (Toggle Switches)
LED Bulbs:
Gauge Cluster:
(5) 74-xHP3 Wedge Base Bulbs
#74-xHP3 LED CAR BULB Specifications
HVAC Control:
(2) WLED-x5 5 LED Wedge Base Bulbs
WLED-x5 (194 type) Wedge Base bulbs Specifications
Toggle Switches:
(6) 3mm LEDs
(6) 1/4 Watt 470 Ohm Resisters
Went to local Radioshack! Like 6 bucks total.
Dome Light:
(1) 4410-x9 9 LED Wedge Base Bulbs
4410-x9 Festoon Bulb Specifications
Gauge Cluster LED Install:
*IMPORTANT*
Before starting the procedure below. Make sure your car has a full tank of gas (you will see why later). Then you want to take your car on a 5 minute drive so it is fully warmed up. At this point, snap pictures of the car's gauge cluster when it is running; when the ignition is on (engine off); and with the key in the off position. This is a crucial step to help with correct needle placement.
1. Disconnect negative terminal on the battery.
2. Look under the steering wheel and and above the gauge cluster, you will see two T-15 Torx head screws holding in the gauge outer trim. Remove with Torx head driver.
3. Remove Headlight Knob- Do this simply by pulling out the retainer clip (in the little slot; pull away from shaft) and then pull with even pressure untill the headlight knob releases.
4. Now we can remove the surrounding gauge bezel (trim). Starting from the bottom I started pulling away from the dash with slight pressure untill all of the clips pop out.
5. Once it is removed, you will see that the gauge cluster itself has four T-15 screws holding it in on the outer four corners. Remove these.
6. Then you can start to remove the cluster. Put the steering wheel all the way down and tip the bottom of the gauge forward and then slowly pull out until you can see the two harnesses on the back. Remove these, then take out the cluster.
7. At this point take the cluster to your workshop (office) with a flat work table with the proper tools above so we can further break down the cluster.
8. We want access to the needles and the overlay itself, to do this remove the 8 remaining outer torx head screws (again T-15) and lift straight up to remove the plastic mount peice protecting needles.
9. Once this is done, take a kitchen fork and put the prongs of the fork on both side of the needle and lift slowly staight up. Steady even pressure and it will come off, it is just plastic that is slid onto the pin. (No need to tape or take the extra time to no where needles position was as we will re-calibrate these after LED install).
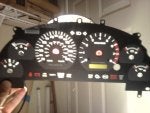
10. Remove the overlay itself. Take a flat head screw driver and scrape gently and flat below the gauge overlay. There is adhesive Ford used to help hold it flat on the diffuser below. Simply work your way around and pull up starting from one end gently until it is fully removed.
11. As seen in the attached pictures below on the backside of the gauge overlay there is a green, on some years blue film on the back of the numbers.
12. This film needs to be removed so the numbers are clear so whichever color LED you used, the overlay will project. To do this, you have two choices. Take the time to wet sand it. I tried this it did work but took longer and it will be tough to get in those tight spaces in the tachometer. I used a dremel to finish this with a fine sander attached. It took a little over two hours for me as I took my time. Make sure you leave the red line on the tach and the red dash on the fuel empty. All other green symbols (blinkers, ABS, etc) you can dremel off.
13. Once the sanding is complete, one of the harder parts is done. Time to install the LEDs. Do not put the overlay and needles back on yet as you will need to flip the cluster to its backside and install your colored LEDs. To do this twist and pull the little white socket out and put the new LED in. 5 Total.
14. Once they are installed take the diffuser to the car and plug it back into the two harnesses. Make sure you reconnect the battery after or you will be sitting there flustered why nothing was working (made this mistake cause I was rushing") ) We are doing this to see if all 5 bulbs work. If one or two do not work, don't panic! All you have to do is flip the bulb around in the socket changing the bulbs polarity so it will work. Repeat this step until all 5 are illuminated.
) We are doing this to see if all 5 bulbs work. If one or two do not work, don't panic! All you have to do is flip the bulb around in the socket changing the bulbs polarity so it will work. Repeat this step until all 5 are illuminated.
15. Once they are illuminated place the gauge overlay onto its normal resting position, you can use adhesive to keep it in place but I didn't bother as it isn't going anywhere. The LED install is now complete all that is left is needle placement, and reinstalling cluster back into car (reverse steps 1-6).
Needle Install:
Remember when I said to take pictures of your cluster, this is the part where your pictures come in handy! To start off, you need to be in your car with the gauge cluster connected (two harnesses and battery connected) and just the gauge overlay installed so you can begin placing needles. Unfortunately, you cannot just place the needles and expect it to be golden. If have any luck like me, you will find out that it reads you a half tank of gas (when it is full), you are going 65 (cars sitting in driveway), and your taching out at 4500 RPM (wrong again)! :nogrinner There are a series of steps you can do to eliminate these problems.
1. Now assuming you haven't ran the car, you can eliminate 4 of the smaller gauges (fuel, engine temp, battery, and oil pressure) by simply turning the key on to accessory position and with the gauge connected place the needles in the same position as the picture. These for the most part will be accurate as nothing changed and it can be double checked later with the next step.
2. For the speedometer and tachometer you can either look off your RPM when your car is running and simply place the needle. Then for the speedo have someone sit in the passenger seat with GPS while in a parking lot and place the needle on the GPS's readout speed. Or follow the steps below (thanks to sillyrabbit0420):
-Put your key in the ignition
-Press and hold the odometer button while turning the key to the "accessory" position
-The readout will say "Test"
-Release the button
-Start the car
-Cycle through the screens until you get to the digital tach read out. Then you know what RPMs your engine is running at and can position the needle on the tach accordingly.
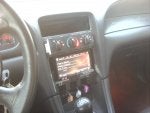
HVAC LED Install:
*Note: If you are switching toggles you may want to consider doing this at the same time if you do not want to take the dash apart twice.
1. First you need to remove the bezel to have access to the HVAC control panel. To do this simply pop the clips out of the shifter boot, starting from the base of the shifter (where 4th gear is) and working your way up. By providing gentle even pressure and some force it will pop out. Then put the car in first gear and slide the unit over to the driver side giving you access to the bezel around your headunit and HVAC.
2. Next, pull from the bottom of the dash bezel and the first couple clips will pop out. Before you can remove it all the way by working your way up like the shifter boot you have to disconnect the three toggle switches. To do this take a small flathead screw driver and push the small tab in located on the right side of the switch while pulling the back colored portion of the switch in the opposite direction toward the front of the car.
3. Then remove the knobs by pulling straight out toward the rear of the car. You can pry with a flat head on the edges, but be careful not to scratch overlay.
4. Once the HVAC unit itself is exposed comes the tricky parts. You want to get inside the actual unit so you can remove the green plastic film Ford put inside the diffuser/reflector. To do this you have to pry evenly on the 10 white tabs (5 on top, 5 on bottom) so you can remove the unit within the housing.
5. When it is removed look on the rear side of the diffuser. There is a plastic casing pinching a piece of laminent Ford used to create green illumination. This needs to be removed. The easiest way I found out about going about this using a flat head and tweezers to pry up on the laminent where there were breaks in the plastic diffuser. It is squeezed into tight spaces so you have to work it and remove it in sections making it easier. It will take time but when you have a good portion removed pinch an edge with needle nose and pull it gently so it slides out all together and does not rip.
6. Next you need to remove the green on the knobs. Flip the knob on its backside and you will see a little plastic chip almost the size of a small lego. Using needle nose pliers firmly grab both side of it and pull straight out. It will take force, but it will not break do not worry. When it is removed you will see a green on the tip. Ford painted on the edge of this. Simply use a razer blade and scrape off most of the residue then use plastic cleaner to clean it up.
7. Now that you are done altering the unit itself and everything is clear/white you are ready to reinstall what you took apart. After that is complete you need to put in the LEDs. To do so you need to remove the 4 T-15 head screws holding the unit and pull it out as much as the rear connectors allow.
8. Once this is done, there are two black sockets similar to the white ones on the gauge cluster. Simply twist and pull outward from the unit and install bulb, once again checking polarity.
*Note: You do NOT need to remove the rear connectors. This will simply be a waste of time and a whole other mess you have to put back together.
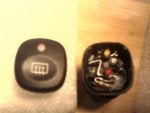
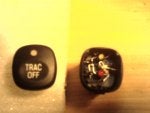
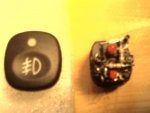
Toggle Switch Install:
(Rear Defrost, Trac Control, Fog Light Toggles)
*Note: This the PITA part of the entire experience. I will try to cover the things I had trouble with hopefully eliminating most questions.
*Note: I have pictures attached of my wiring scheme for each toggle. Follow that, and remember to solder the resistor on the possitive terminal of the LED.
1. Remove the three switches from the bezel, they simply pop forward out of the front by providing pressure from the back.
2. Then we need to break down the toggle switch further. First, remove the top caps or switch itself, these as well just pop straight off easily.
3. Now the outer housing of the switch is held by 4 clips, 2 on each side. I only removed the outer housing on the fog light switch for better access and because I was removing both LEDs not just one like on the defroster and trac control. These are a PITA job to remove, but they do come off. Best way is a razor blade or two and pry around the switch.
4. One the switches are disassembled take note on how the current LEDs are wired. I will have pictures below on how I wired each switch so there is no need to panic as I did the work for you. The lights Ford uses have built-in resistors. The ones from radioshack do not, which is why we have to solder the resistor onto the possitive end of the LED. Not the funnest job in the world, but I have done the research for you so this will shave off a lot of time on the install.
5. To do the install take an LED and a resistor and before you do anything find the possitive side of the LED. It will be the longer of the two, that will be the possitive wire. This is where you solder the resistor onto the possitive wire and connect the one end of the resistor to the copper end and crimp it following my scheme in the pictures.
That is pretty much it! You have completed the install and made your dash one hell of a custom peice now. This is just a guideline, I am sure there will be questions along the way so just post them here or PM me and I will gladly answer them. Hopefully this thread will be noticed, and can provide answers for upcoming posts! Enjoy and happy modding! :bigthumbsup
Finished result:
http://www.allfordmustangs.com/photopost/uploads/124965/DSC031462.JPG
http://www.allfordmustangs.com/photopost/uploads/124965/DSC031472.JPG
http://www.allfordmustangs.com/photopost/uploads/124965/DSC03152.JPG
http://www.allfordmustangs.com/photopost/uploads/124965/DSC031511.JPG
http://www.allfordmustangs.com/photopost/uploads/124965/DSC031501.JPG
Tools Needed (Recommended):
T-15 Torx Driver (Cluster and HVAC)
Dremel/Sandpaper (Gauge Overlay)
Flat Head Screw Driver (Gauge Cluster)
Needle Nose Pliers (Bulb sockets)
Kitchen Fork (Needle Removal)
Soldering Iron (Toggle Switches)
LED Bulbs:
Gauge Cluster:
(5) 74-xHP3 Wedge Base Bulbs
#74-xHP3 LED CAR BULB Specifications
HVAC Control:
(2) WLED-x5 5 LED Wedge Base Bulbs
WLED-x5 (194 type) Wedge Base bulbs Specifications
Toggle Switches:
(6) 3mm LEDs
(6) 1/4 Watt 470 Ohm Resisters
Went to local Radioshack! Like 6 bucks total.
Dome Light:
(1) 4410-x9 9 LED Wedge Base Bulbs
4410-x9 Festoon Bulb Specifications
Gauge Cluster LED Install:
*IMPORTANT*
Before starting the procedure below. Make sure your car has a full tank of gas (you will see why later). Then you want to take your car on a 5 minute drive so it is fully warmed up. At this point, snap pictures of the car's gauge cluster when it is running; when the ignition is on (engine off); and with the key in the off position. This is a crucial step to help with correct needle placement.
1. Disconnect negative terminal on the battery.
2. Look under the steering wheel and and above the gauge cluster, you will see two T-15 Torx head screws holding in the gauge outer trim. Remove with Torx head driver.
3. Remove Headlight Knob- Do this simply by pulling out the retainer clip (in the little slot; pull away from shaft) and then pull with even pressure untill the headlight knob releases.
4. Now we can remove the surrounding gauge bezel (trim). Starting from the bottom I started pulling away from the dash with slight pressure untill all of the clips pop out.
5. Once it is removed, you will see that the gauge cluster itself has four T-15 screws holding it in on the outer four corners. Remove these.
6. Then you can start to remove the cluster. Put the steering wheel all the way down and tip the bottom of the gauge forward and then slowly pull out until you can see the two harnesses on the back. Remove these, then take out the cluster.
7. At this point take the cluster to your workshop (office) with a flat work table with the proper tools above so we can further break down the cluster.
8. We want access to the needles and the overlay itself, to do this remove the 8 remaining outer torx head screws (again T-15) and lift straight up to remove the plastic mount peice protecting needles.
9. Once this is done, take a kitchen fork and put the prongs of the fork on both side of the needle and lift slowly staight up. Steady even pressure and it will come off, it is just plastic that is slid onto the pin. (No need to tape or take the extra time to no where needles position was as we will re-calibrate these after LED install).
10. Remove the overlay itself. Take a flat head screw driver and scrape gently and flat below the gauge overlay. There is adhesive Ford used to help hold it flat on the diffuser below. Simply work your way around and pull up starting from one end gently until it is fully removed.
11. As seen in the attached pictures below on the backside of the gauge overlay there is a green, on some years blue film on the back of the numbers.
12. This film needs to be removed so the numbers are clear so whichever color LED you used, the overlay will project. To do this, you have two choices. Take the time to wet sand it. I tried this it did work but took longer and it will be tough to get in those tight spaces in the tachometer. I used a dremel to finish this with a fine sander attached. It took a little over two hours for me as I took my time. Make sure you leave the red line on the tach and the red dash on the fuel empty. All other green symbols (blinkers, ABS, etc) you can dremel off.
13. Once the sanding is complete, one of the harder parts is done. Time to install the LEDs. Do not put the overlay and needles back on yet as you will need to flip the cluster to its backside and install your colored LEDs. To do this twist and pull the little white socket out and put the new LED in. 5 Total.
14. Once they are installed take the diffuser to the car and plug it back into the two harnesses. Make sure you reconnect the battery after or you will be sitting there flustered why nothing was working (made this mistake cause I was rushing
) We are doing this to see if all 5 bulbs work. If one or two do not work, don't panic! All you have to do is flip the bulb around in the socket changing the bulbs polarity so it will work. Repeat this step until all 5 are illuminated.15. Once they are illuminated place the gauge overlay onto its normal resting position, you can use adhesive to keep it in place but I didn't bother as it isn't going anywhere. The LED install is now complete all that is left is needle placement, and reinstalling cluster back into car (reverse steps 1-6).
Needle Install:
Remember when I said to take pictures of your cluster, this is the part where your pictures come in handy! To start off, you need to be in your car with the gauge cluster connected (two harnesses and battery connected) and just the gauge overlay installed so you can begin placing needles. Unfortunately, you cannot just place the needles and expect it to be golden. If have any luck like me, you will find out that it reads you a half tank of gas (when it is full), you are going 65 (cars sitting in driveway), and your taching out at 4500 RPM (wrong again)! :nogrinner There are a series of steps you can do to eliminate these problems.
1. Now assuming you haven't ran the car, you can eliminate 4 of the smaller gauges (fuel, engine temp, battery, and oil pressure) by simply turning the key on to accessory position and with the gauge connected place the needles in the same position as the picture. These for the most part will be accurate as nothing changed and it can be double checked later with the next step.
2. For the speedometer and tachometer you can either look off your RPM when your car is running and simply place the needle. Then for the speedo have someone sit in the passenger seat with GPS while in a parking lot and place the needle on the GPS's readout speed. Or follow the steps below (thanks to sillyrabbit0420):
-Put your key in the ignition
-Press and hold the odometer button while turning the key to the "accessory" position
-The readout will say "Test"
-Release the button
-Start the car
-Cycle through the screens until you get to the digital tach read out. Then you know what RPMs your engine is running at and can position the needle on the tach accordingly.
HVAC LED Install:
*Note: If you are switching toggles you may want to consider doing this at the same time if you do not want to take the dash apart twice.
1. First you need to remove the bezel to have access to the HVAC control panel. To do this simply pop the clips out of the shifter boot, starting from the base of the shifter (where 4th gear is) and working your way up. By providing gentle even pressure and some force it will pop out. Then put the car in first gear and slide the unit over to the driver side giving you access to the bezel around your headunit and HVAC.
2. Next, pull from the bottom of the dash bezel and the first couple clips will pop out. Before you can remove it all the way by working your way up like the shifter boot you have to disconnect the three toggle switches. To do this take a small flathead screw driver and push the small tab in located on the right side of the switch while pulling the back colored portion of the switch in the opposite direction toward the front of the car.
3. Then remove the knobs by pulling straight out toward the rear of the car. You can pry with a flat head on the edges, but be careful not to scratch overlay.
4. Once the HVAC unit itself is exposed comes the tricky parts. You want to get inside the actual unit so you can remove the green plastic film Ford put inside the diffuser/reflector. To do this you have to pry evenly on the 10 white tabs (5 on top, 5 on bottom) so you can remove the unit within the housing.
5. When it is removed look on the rear side of the diffuser. There is a plastic casing pinching a piece of laminent Ford used to create green illumination. This needs to be removed. The easiest way I found out about going about this using a flat head and tweezers to pry up on the laminent where there were breaks in the plastic diffuser. It is squeezed into tight spaces so you have to work it and remove it in sections making it easier. It will take time but when you have a good portion removed pinch an edge with needle nose and pull it gently so it slides out all together and does not rip.
6. Next you need to remove the green on the knobs. Flip the knob on its backside and you will see a little plastic chip almost the size of a small lego. Using needle nose pliers firmly grab both side of it and pull straight out. It will take force, but it will not break do not worry. When it is removed you will see a green on the tip. Ford painted on the edge of this. Simply use a razer blade and scrape off most of the residue then use plastic cleaner to clean it up.
7. Now that you are done altering the unit itself and everything is clear/white you are ready to reinstall what you took apart. After that is complete you need to put in the LEDs. To do so you need to remove the 4 T-15 head screws holding the unit and pull it out as much as the rear connectors allow.
8. Once this is done, there are two black sockets similar to the white ones on the gauge cluster. Simply twist and pull outward from the unit and install bulb, once again checking polarity.
*Note: You do NOT need to remove the rear connectors. This will simply be a waste of time and a whole other mess you have to put back together.
Toggle Switch Install:
(Rear Defrost, Trac Control, Fog Light Toggles)
*Note: This the PITA part of the entire experience. I will try to cover the things I had trouble with hopefully eliminating most questions.
*Note: I have pictures attached of my wiring scheme for each toggle. Follow that, and remember to solder the resistor on the possitive terminal of the LED.
1. Remove the three switches from the bezel, they simply pop forward out of the front by providing pressure from the back.
2. Then we need to break down the toggle switch further. First, remove the top caps or switch itself, these as well just pop straight off easily.
3. Now the outer housing of the switch is held by 4 clips, 2 on each side. I only removed the outer housing on the fog light switch for better access and because I was removing both LEDs not just one like on the defroster and trac control. These are a PITA job to remove, but they do come off. Best way is a razor blade or two and pry around the switch.
4. One the switches are disassembled take note on how the current LEDs are wired. I will have pictures below on how I wired each switch so there is no need to panic as I did the work for you. The lights Ford uses have built-in resistors. The ones from radioshack do not, which is why we have to solder the resistor onto the possitive end of the LED. Not the funnest job in the world, but I have done the research for you so this will shave off a lot of time on the install.
5. To do the install take an LED and a resistor and before you do anything find the possitive side of the LED. It will be the longer of the two, that will be the possitive wire. This is where you solder the resistor onto the possitive wire and connect the one end of the resistor to the copper end and crimp it following my scheme in the pictures.
That is pretty much it! You have completed the install and made your dash one hell of a custom peice now. This is just a guideline, I am sure there will be questions along the way so just post them here or PM me and I will gladly answer them. Hopefully this thread will be noticed, and can provide answers for upcoming posts! Enjoy and happy modding! :bigthumbsup


